Rebuilt engine will consist of a bench flowed cylinder head (by NZ's top Toyota Guru) with HKS 264 cams and uprated valve springs. Block to have oilways cleaned up (rough castings as standard) to improve flow and will be reassembled with fully balanced crank, TRD shells, OE rods, ACL pistons (0.5 oversized) (Now changed to +1mm Wiseco) and ARP head studs/rod bolts. That will be coupled to a lightweight flywheel and uprated clutch. This will allow the rev limit to be increased to at least 8000rpm. Cooling will be kept in check with a much larger Koyo rad.
Once this is all put together, boost will be turned back down and the engine will be given time to run in properly. Will also give me chance to sort out a decent intake system using an A'Pexi filter and custom made carbon fibre cold air box. WAI will also be lagged and potentially a larger pre-rad to help keep inlet temps down. Then, I can look at a custom built tubular exhaust manifold, BB turbo (probably a GT30) and an A'Pexi ECU. Will also be fitting some GReddy 720cc top feed injectors too.
Here's the story so far....
Rods were finished being shotpeened and polished last night along with the pistons, crank, flywheel and clutch cover, they went down to the engine balancer.
Crank, flywheel and cover plate were loaded up and balanced to within a gnats whisker...


The digital printout...

The completed rods. All weighed and within 0.01g of each other...

The lower end was then 'dummy' assembled to ensure that the deck height was okay. Within 1/100th mm from end to end.

The one thing that had been holding everything up was been the TRD main shells. They finally arrived - at least 8 of them did. The centre bearings weren't sent out due to a mix up so would be delayed

Still, with the other shells, we could measure up the crank to see if any machining was required. Forget the measurement, but a miniscule amount needs to come off the crank so off it went along with the block to the engine reconditioners.
Shell sizes being measured...

In the meantime, took the opportunity to clean up the gearbox. After 11 years use, it was absolutely caked in cr@p..


So out came the industrial strength cleaner, a stiff wire brush, hosepipe and lots of elbow grease. Here's the result...


With that cleaned, new driveshaft seals and release bearing were fitted. Clutch release slave unit was looking a little worse for wear so a replacement is in order.
Then disaster. While the ACL pistons were being fitted, one of the cylinders was badly scored (not by me I hasten to add!). A light hone woudn't be enough, so it would have to be a 1mm oversize bore. First though, an ultrasonic test to ensure enough 'meat' between #2 & #3 cylinders. Fortunately the scan was good - showing 4.3mm of material. Phew!
At this stage, I was about to fly off on holiday for 3 weeks, so I left it to my mechanic mate to sort out the re-bore and fitting of some new pistons.
While I was swanning around Europe, the new pistons were successfully fitted to the revised block....


... we couldn't get some ACL +1mm pistons so turned to a set of Wisecos from the US...

So, with that part completed, I could now start putting everything back together..

ARP studs fitted along with the new HG...

Oil pick-up and splash pan fitted following a few hours in the acid bath....

New crank oil seal fitted....

Due to different cams, altered CR and different pistons, a test was required to ensure that valves and pistons didn't come into contact with each other so off to the local toy shop for some...

This was then put onto the piston crowns where the valves would likely come into contact...

Once all 4 pistons had been set so they sat half way up the bores, the cylinder head could be fitted and torqued into place....

The top cam cover backing plate and lower belt cover were fitted next to ensure that the cam wheels and bottom pulley were positioned correctly....

.... prior to the cambelt being fitted....

Once everything was properly assembled, the engine was carefully turned over for a few revolutions, taking care to ensure that there was no unwanted resistance.
Then, the belt and head were removed so the doh on the pistons could be inspected. This revealed plenty of clearance between pistons and valves. Obviously a good thing....

With the doh removed, the head could be refitted. This being the current state and the end of play today...

Managed to skive of work this arvo and managed to get quite a bit done.

Finishing off fitting the sump to the bottom of the motor...

... including a nice shiney powdercoated sump pan


Genuine parts where possible. New belt and idler and tensioner wheels...

... finished off the camblet side of things...

... allowing the bottom cover to be fitted.

OE fuel rail (for now) was bolted on. As this was originally a
3SGE head, slight mods had to be made - including the injector holes which needed to be enlarged to suit the 3S-GTE injectors.

Then the inlet manifold could go on.

To the front and fitment of the
alternator bracket and bling
alternator 

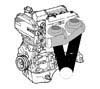
State at the end of the day. Loom is now partially fitted along with numerous hoses etc. Really glad I took lots of photos
before I stripped the motor down


Need to adapt the cam cover slightly as I can't use the centre throttle body support due to the lack of castings etc on the n/a head. No real issues asthere is plenty of other support. Once that is done the cover can be fitted. Then, hopefully, time to fit the box. More to follow tomorrow
Gary
_________________

1994 Toyota Celica ST205 GT-Four Group A WRC - running in rebuilt engine....