HOW TO - INSTALL AN OIL COOLER ON AN ST205
Submitted by - Mike Kelly
** This article has pictures from the ST205 but the procedure is the same for all the GT4s **
Disclaimer
Please read the instructions thoroughly before attempting any work on your car, this is written as a useful guide to how I fitted an oil cooler, if in doubt always consult a professional, deviations from the manufacturers specification may damage your vehicle. The author or the GT4 Drivers Club can not be held responsible for any loss or damage resulting from use of this article.
Why install an Oil Cooler?
It has been noted by many GT4 drivers after installing an oil temperature gauge that even under normal driving the oil temperature can reach 100+ degrees C. When the cars are driven hard or on a circuit temperatures in excess of 130 degrees C have been seen. Whilst many oils claim to be able to deal with such temperatures it is still beneficial to reduce oil temperatures for reasons of reliability and durability. Given that the oil and water systems are linked, any reduction in the temperature of the oil by means of an oil cooler reduces the load on the main water radiator. This install is specific to the ST205 however many aspects will be the same for the ST185 and ST165.
What components are needed?
The principle components you will need are:-
Oil filter take-off plate - fits between the oil filter and its mount. The take-off plate I chose has an integral thermostat to ensure that the oil does not become too cool, as this could cause any number of issues. The thermostat is set at 82 degrees C.
Adapters - 2 male to male adapters are needed to convert the female holes of the take-off plate (1/2 BSP) to the male size needed for the pipe work, I opted for -10JIC fittings as this is an industry standard and will provide decent flow to ensure that the pipe work is not restrictive.
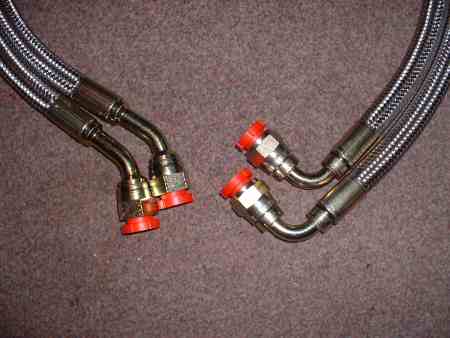
Fittings - as mentioned above 4 fittings are needed, Aeroquip fittings which are anodized red and blue are commonly used for oil cooler pipework however they are expensive at around £25 per item which almost doubles the cost of the exercise. Instead I used steel fittings which are much cheaper but should still provide good service, these fittings are also swaged which should help with durability. For my install I used 45 degree fittings on the take-off plate and 90 degree fittings into the oil cooler.
Pipe work- if you are using the above thermostat then 2 lengths of pipe are needed, I chose 1/2" braided lines to allow for decent flow, high durability and an attractive finish. My hoses are 1.0 and 1.1 metres long but this will depend on the location chosen for the cooler. You need to consider which way the fittings are to be located on the hose I had my fittings set at opposites but this resulted in a slightly longer route than necessary so you may want to measure up your own lengths of hose.
1/2" Braided Hose with -10JIC Steel Fittings - note the factory swaged joints
Cooler - the final piece of the install is the cooler itself, I have discussed below how I chose my particular item. you'll need to consider where and how you are going to mount the cooler. Due to its size I mounted my cooler directly behind the vent in the bumper, this does not appear to have had any real impact on either main engine or charge cooler water temperatures.
Brackets - for fixing the cooler to the car.
New Oil/Filter/Plug Gasket- Since you have to drain the oil and remove the filter its a good idea to tie this job up with a change of these items.
What tools are needed?
A basic selection of tools should suffice including an oil filter removal tool, some large sockets and an adjustable spanner for work on the take-off plate and the pipe work fittings.
What cooler to choose?
Coolers are available in many types, shapes and sizes. I opted for a Mocal oil to air cooler supplied by ThinkAutomotive, this company specializes in automotive plumbing, I found them to be very helpful. The specific cooler I chose is a 13 row 235mm wide item, this choice was based on recommendations from ThinkAutomotive that for engines of over 2 litres a 13 row item should be used. Also to consider is the size of the fittings on the oil cooler, I opted for -10JIC fittings as this is an industry standard and will provide decent flow to ensure that the pipe work is not restrictive.
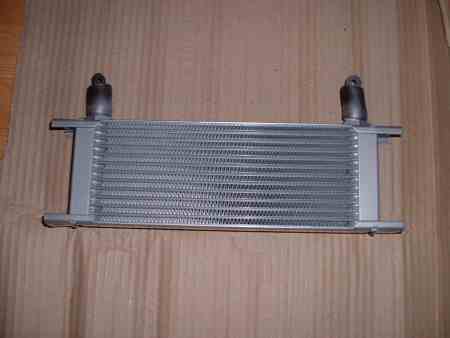
13 row 235mm wide Mocal Oil Cooler
Procedure
Firstly you need to remove the right engine under tray to give access to the oil filter, drain the oil and remove the oil filter.
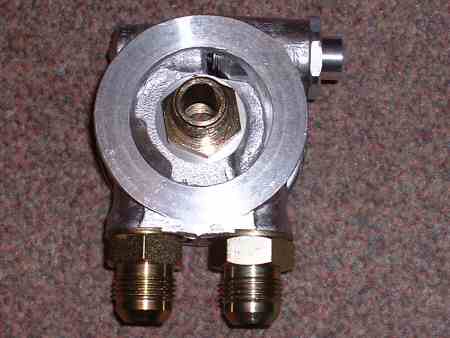 |
Ensure that the male to male adapters are tightly secured in their holes |
| Place the take-off plate onto the filter housing rubber side up and fasten it with the middle securing bolt, great care should be taken that the bolt is not cross threaded and the plate is seated correctly and flush to the filter mount. The bolt can be nipped up with a spanner but be sure not to over-tighten | |
| Remove the grille from the bumper with a screw driver by twisting each fastening through 90 degrees and pushing them out. withdraw the 6 fasteners, 2 metal plates and the grille. The mounting system for the grille is badly designed and a pain to fit back together although it is possible. I opted for some black cable ties which are quite discreet | |
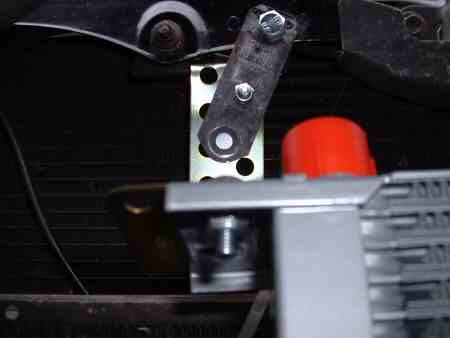 |
Remove the right horn and replace the mounting bracket at the angle shown,
bend a bracket for the oil cooler into the correct shape to allow the oil cooler
to be mounted. The cooler will need to be at a slight angle to gain clearance
for the fittings and hoses on top Fix the cooler bracket to the cooler and the other end to the horn bracket by means of some small bolts and nyloc nuts, these are supplied with the bracket kit. I secured the bottom of the oil cooler with two large cable ties, this does not look like great engineering practice however it seems to work and given the fragility of the oil coolers I would not want it rigidly mounted and subject to the vibration from the car. I pre-filled my oil cooler to ensure that the level of oil remained constant |
 |
With the take-off plate and cooler in place connect the pipe work up to each end, be sure not to over tighten the fittings. Check thoroughly that there are no kinks in the hose and that all the bends are smooth arcs. It will likely require some fiddling to get the route right and the fittings connected. My route passes up over the main beam light unit then through a gap in the slam panel and down to the oil filter. |
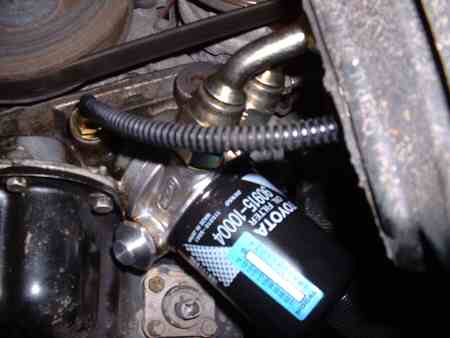 |
Fill your new oil filter and screw onto the take-off plate. (The blue sticker is a paper based single use heat strip which measures the maximum temperature reached) |
| Double and triple check all seals and connections to make sure they are properly secured | |
| Remove the EFI fuse and crank the engine till the oil pressure light has gone out, then check for any evidence of oil at any of the connections | |
| With an assistant crank the engine some more watching for any oil leaks | |
| Replace the EFI fuse and start the engine whilst simultaneously watching for leaks. Warm the engine up completely (circa 15 minutes) varying the rpm from idle to fast idle - be sure to switch the engine off immediately if any leaks are found | |
| Assuming that no leaks are found - take the car for a gentle test drive and check again for leaks | |
 |
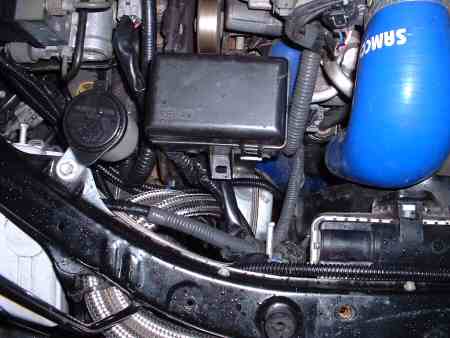
Replace the front grille and engine under tray. This picture shows the finished install just behind the grille |
Part Numbers
If you choose to purchase your parts from ThinkAutomotive then you may find the following part numbers and prices useful. Please bear in mind that part numbers and prices can change.
| ITEM | Qty | PART No |
TOTAL COST £ |
| Take-Off Plate with thermostat |
1 |
OTSP1 | 34.07 |
| Female 45 degree -10JIC steel fitting |
2 |
HEF47-10-8 | 10.82 |
| Female 90 degree -10JIC steel fitting |
2 |
HEF97-10-8 | 6.46 |
| Male to male adapter 1/2BSP to -10JIC steel |
2 |
MMS0-8-10 | 2.66 |
| 1/2" braided hose (metres) |
2.1 |
S100R6-8 | 20.24 |
| Oil Cooler 13 row 235mm wide |
1 |
OC5137-10 | 58.84 |
| Bracket Kit |
1 |
BKRT1 | 3.03 |
| Total Price (+ VAT) | 136.12 |
Useful information
The oil filter thread on the ST185 and ST205 is 3/4 UNF if anyone can confirm this for the ST165 I would be grateful.
Conclusion
In summary the oil cooler is certainly doing its job, my peak oil temperatures on track are down from around 115C to around 95C. During a session at Silverstone I saw a peak temperature of 98C whilst a friend driving a similar spec ST205 using the same oil saw peaks of over 120C. Since the weather has become cooler a flaw has shown up in the system, whilst the thermostat is rated at 82C, thermostats are not digital devices, they begin to open at a lower temperature letting some oil through. In cool weather this is resulting in the temperature of the oil struggling to reach 70C due to the efficiency of the stock setup when there is water spray present the problem is particularly bad. In the short term I plan to fit a metal plate over part of the cooler to reduce the area through which air can pass, this should help. In the long term I may consider the purchase of a smaller 10 row cooler as the maximum temperatures I see on track could be increased slightly.