www.gt4dc.co.uk
Maintain, Modify and DRIVE your GT-Four


It is currently Tue Oct 07, 2025 12:30 am


Post new topic Reply to topic  [ 168 posts ]  Go to page Previous  1, 2, 3, 4, 5 ... 12  Next
Author Message
 Post subject:
PostPosted: Tue Sep 22, 2009 11:49 am 
Offline
Club Staff
User avatar

Joined: Thu Jul 14, 2005 12:44 pm
Posts: 4067
Location: drinking devil fuel
Car Model: ST205
It's always easy to find mates to critique :lol:

The trouble with starting these things is always getting carried away. When i started on the rear of mine i never intended it to go so far and even now I'd like to redo it as I'm not happy I didn't replace everything rubber with new and I know that the paint finish isn't good enough. It's a huge financial and time commitment to do it all correctly and I just wanted to drive the blasted thing for a change


Top
 Profile  
 
 Post subject:
PostPosted: Sun Feb 21, 2010 11:01 am 
Offline
Group N

Joined: Mon May 26, 2008 2:33 pm
Posts: 401
Location: Wellington, New Zealand
Car Model: ST185
So I haven't bothered to update for ages. Lots of changes in life, more work on the celica as I'm not as busy and I need to fill my days while unemployed and looking for work.

Bunged my back/shoulder blade today, so couldn't do any work as I couldn't raise my arm properly and didn't want to aggrevate it any more. Must be the way I sleep I reckon..

Anyhoo, decided that its time for an ULTRA update! I really mean ultra. I've sorted all my photos and have started putting them in my photobucket.

On OC i mentioned the following on Jan 21, 2010.

Quote:
whats new really?
st182 gen2 shifter (to test short shifting) + mounting plate - $15
clutch pedal and pedal cage - $11
shifter mounting plate (cos somehow I dethread one of the bolts on the other shifter mount) - $6
st182 gen 2 side engine mounts, cam side took 3 hours to remove with block and tackle holding up engine. gb side took 15 minutes - $8 each (yay for more urethane!)
st215 side feed manifold + throttle body - $160 8)
Hilux Surf / 4runner 4 pot brakes - $52
st18x gen 2 lights ex centre plint - $40
st185 drivers and passenger seats - $11 (score hahaha)


Lets get into it 8)

_________________
GT Four Adovansu

"I want to enjoy the powerful and nimble agility behavior."

Image


Top
 Profile  
 
 Post subject:
PostPosted: Sun Feb 21, 2010 12:38 pm 
Offline
Group N

Joined: Mon May 26, 2008 2:33 pm
Posts: 401
Location: Wellington, New Zealand
Car Model: ST185
So back in Oct 08, this is how it looked.
Image

Image

As you can see, it is an absolute mess. At the time the engine came out, there was an oil leak so it go pretty messy in the bay.
Image

Image

Image

Just after New Years 08 -> 09 the car actually came out of the garage. I needed to lay a large plastic drop cloth down to ensure I didn't wreck teh garage floor.
The elephant hasn't been out of the garage since.
Image

Image

Sheet down ready to get into it.
Image

Yay for cleaning products. I procrastinated about this for ages until I finally got stuck in and cleaned the *bleep*.
Image

Boo for screws. There is a small pile of screws sitting on my bench on the far side of the garage, still unsorted. Guess we'll see where they go when I put it all back together.
Image

For some reason, there was black paint in the bay. No crash damage evident, so I assume a Friday build.
Image

This is the main reason I wanted to clean up the bay. Badly applied seam sealer - SO UGLY!
Image

Look at this mess! I reckon that a rookie was in the bay along on the passengers side and he did a crap job.
Image

My battery bracket looking the worse for wear. Thats getting removed!
Image

Removed everything out of and around the bay and suspension arms and bits. Got into cleaning, took me a couple of nights to do.

Couldn't take a high shot as I have wheels, engine and gearbox next to the front of the car. Hope you like the compilation.
Image

This side of the bay is much tidier for some reason. As said before, I reckon its because of two people in the bay, one experienced on drivers side, one rookie on passengers side.
Image

Direct comparison from one strut tower to the other
Image

Image

removing seam sealer in this section was a *bleep*!
Image

Power steering mount area is free of cracking. I have subsequently taken it back to bare metal in this area and there is no evidence of cracking due to stress. I'll leave it as it is.
Image

Underbody sealer all over the place :(
Image

Crack on one of the welded nuts. Will have to fix that up.
Image

As you can see, the seam sealer is all dry and cracked up.
Image

I used a heatgun to loosen it up and then used a scrapper/screwdriver/blade to remove the sealer.
Image

Image

Image

Image

Deplorable I tell ya - sigh. This area of seam sealer covered 3 pieces of metal welded together. Time consuming to say the least.
Image

As you can see, this side is a lot smoother.
Image

I removed nearly all the seam sealer in the bay - this is the behind the front frame of the bay.
Of note, I didn't remove sealer in between panels as I'd then have to ensure that there was no rust between.

Majority of seam sealer was removed manually. I tried the EZ strip disc on the angle grinder in a couple of places and it just clogged the disc.
Otherwise I just got messy and used a wire brush attachment on the hammer drill. Basically I was trying not to go all the way down to the original primer on the metal. That way, there was less risk of rusting in hard to reach places.
Image

Image

Image

Paint over spray from factory and drips... shocking!
Image

Jonno came over and decided to remove the battery bracket. He works fast, while I am more pedantic in how I go about doing my work. Guess thats why he's modified his car so much and I am still going :lol:
Image

Image

Image

Clean chassis rail
Image

Image

While he was here, he also welded up the engine mount brackets a bit more solidly. We did discuss stitch welding all the panels, but decided against it since it would make the car too stiff and it will be a daily driven car.
He did blow a hole in one area of panel on the drivers side but that is getting fixed soon along with welding up holes in the bay.
Image

Image

My aim is a very smooth engine bay. Jonno bogged up a lot of areas and spot welded depressions. I had the job of cleaning up stuff.
This is how the bay looked before Christmas 09.
Image

So that is the engine bay so far.
Metal is starting to rust. Its been humid over here, but nothing a quick go over with the EZ strip disc won't fix.
More bogging and sanding and have to fix the weld blow hole. Get that cracked nut/panel welded and cut up some metal to fill holes I won't use in the bay.

Of note, I am looking at a Mitsi Pajero rear under seat heater for demister duties.
Basically I was looking at computer fans or electric hairdryers but after research, they just weren't good enough.
The pajero unit uses the water pipes for the heater like standard. I'll just need to figure out how to control it, but it is a smaller unit compared to a standard fan unit.

Maybe a good alternative for race cars :)

So ends the engine bay update.

_________________
GT Four Adovansu

"I want to enjoy the powerful and nimble agility behavior."

Image


Top
 Profile  
 
 Post subject:
PostPosted: Sun Feb 21, 2010 1:16 pm 
Offline
Group N

Joined: Mon May 26, 2008 2:33 pm
Posts: 401
Location: Wellington, New Zealand
Car Model: ST185
So I started work on the front suspension components as well as doing measurements for the brake upgrade.
Typically everything was dirty, not surprising for a 20 year old car :lol:
Image

Cleaned up vs dirty. I'll most likely give the A arms a light sand and then paint. No use going back to bare metal as normally new paint will just chip off and I'm too cheap to powder coat :lol:
Image

Amazingly some components are actually silver!
Image

After dunking various bits and bobs in malt vinegar over night, they come out mighty fine and clean. Of note, the vinegar / acetic acid, attacked the zinc aggressively, so components that were dunked have to be re-zinced or etch primed before painting.
Image

Ah - my Tein HA's - Driving Master! The Teins were corroded and it was time to clean them up (only started the other night :lol: )
Also, I don't want green on my car. I'll paint them red to match the overall theme of teh elephant.
Image

Cos I like to keep a record of all my stuff, you get the pictures :P
Image

Image

Rust bad mmkay...
Image

As you can see, rust down below.
Image

Taped up and ready for stripping.
Image

Tools of choice - EZ Strip disc on angle grinder and wire wheel on drill.
Image

Image

Image

Getting there. Care was taken not to go all the way to the edge. I hand sanded at the edges.
Image

Bottom of the strut with nice rust..
Image

Of note, Tein actually stamped what side the strut should go on. Very handy as I removed teh labels :lol:
Image

Manual brush work to get into hard to reach places.
Image

Stripped and nearly ready for painting. Couldn't get all paint, so ended up sanding stuff as flat as possible. Where there was evidence of rust below the paint, that is where I concentrated on.
Image

I set up a little spray booth out of my old amp rack from the Forester. I was going to make fabricate something up, but knocked out the inner wall piece and added some cardboard and bob's your uncle, spray booth!
Image

of note, I also removed old tape and put on new clean tape as I had cut into the edges of the old tape..
Image

Start of etch priming :) Paint is coming soon!
Image

_________________
GT Four Adovansu

"I want to enjoy the powerful and nimble agility behavior."

Image


Top
 Profile  
 
 Post subject:
PostPosted: Sun Feb 21, 2010 1:18 pm 
Offline
Club Staff
User avatar

Joined: Thu Jul 14, 2005 12:44 pm
Posts: 4067
Location: drinking devil fuel
Car Model: ST205
Looks like that's building up to a mammoth project!

Removing seam sealer is horrible work though, don't envy you there

I plan something similar on the black car when I swap the donk but I don't think I'll be going quite as far as you lol

There was a thread, possibly on 6gc.net, a while ago where a guy in the states detailed and smoothed a gen 6 engine bay. It took a while as he went ITB too but the end result was stunning

I have to say that personally I like stonechip as it's very durable. I'd consider stonechip up to the top of the frame rails painted body colour. The only downside is that the rough finish loves to collect dirt and is a bit of a PITA to clean

One thing I'd suggest is a few aerosoles of acid etch primer. As soon as you get anything back to bare metal get it primed with a thin coat. It doesn't take much to remove it if necessary but it does stop the instant surface rust film.

Out of interest I've seen an Eberspacher hydronic heater that also looks a good fit replacement for the stock heater unit. Most of them come with diesel/kerro burners but there's a unit which is just a fan/matrix affair


Top
 Profile  
 
 Post subject:
PostPosted: Sun Feb 21, 2010 1:23 pm 
Offline
Club Staff
User avatar

Joined: Thu Jul 14, 2005 12:44 pm
Posts: 4067
Location: drinking devil fuel
Car Model: ST205
BTW, loving the cardboard spray booth. I'll steal that idea thank you :D :D


Top
 Profile  
 
 Post subject:
PostPosted: Sun Feb 21, 2010 1:28 pm 
Offline
Group N

Joined: Mon May 26, 2008 2:33 pm
Posts: 401
Location: Wellington, New Zealand
Car Model: ST185
yeah - its totally out of control - hence why its taken over 2 years thus far and a lot of it my procrastination :lol:

Coomer smoother out his engine bay - yellow thing. Some techniques i'll do differently but overall, the Celica bay is a busy place to clean up.

Yes I have aerosols of etch primer in the garage. Surface rust isn't bad so I'm not too worried. All rust in bay will come off in around 1/2 an hour. Hopefully I'll sort that out next week.

I have rhino liner plastic paint on tray/bed liner stuff which will be used on the underside of the car and in the arches. No worries there.

Currently I have the fan unit and wiring loom for a subaru fan. Small and I can fab up a mounting unit and ducting for air. Initially I didn't want two water hoses entering onto the firewall, but I'm thinking practicality will be the overall winner, and I can still dress up two pipes.

Eberspacher units look nice. Prob out of my budget espec shipping to NZ. I believe I can keep budget down and make the pajero heater work out. Just think on this - I need the room under the dash area to fit a 12" audiophile sub and box. Space is a concern for me :lol:

_________________
GT Four Adovansu

"I want to enjoy the powerful and nimble agility behavior."

Image


Top
 Profile  
 
 Post subject:
PostPosted: Sun Feb 21, 2010 1:32 pm 
Offline
Group N

Joined: Mon May 26, 2008 2:33 pm
Posts: 401
Location: Wellington, New Zealand
Car Model: ST185
Ah the paint booth - it used to be this!

Image

I just removed the internal shelving and covered the sides up. The screw at the top were very handy for hanging metal wires down from. I used a wire coat hanger, cut it up and made painting hangers from them :)

_________________
GT Four Adovansu

"I want to enjoy the powerful and nimble agility behavior."

Image


Top
 Profile  
 
 Post subject:
PostPosted: Sun Feb 21, 2010 1:37 pm 
Offline
Club Staff
User avatar

Joined: Mon Mar 26, 2007 5:53 pm
Posts: 1736
Location: Another Shire County
Car Model: ST185
Quote:
I used a wire coat hanger, cut it up and made painting hangers from them

That's worth a BLUE PETER badge :lol:

Great project thread - keep up the hard work - this is going to turn out real nice 8)

_________________
Vice Chairman
1990 White UK Celica ST185 - Project DTM
1997 Cream BMW R1200C (as seen in James Bond "Tomorrow Never Dies")
2005 Jaguar X-type 3.0 Sovereign AWD Automatic
Blood Bikes - https://www.freewheelers.org.uk/


Top
 Profile  
 
 Post subject:
PostPosted: Sun Feb 21, 2010 1:45 pm 
Offline
Club Staff
User avatar

Joined: Thu Jul 14, 2005 12:44 pm
Posts: 4067
Location: drinking devil fuel
Car Model: ST205
Coomer, that's the guy. Awsome job


Rhino Liner - brilliant stuff

How about an 8" subin the original blower/AC matrix housing :lol:

I wonder if I could make a walk in spray booth out of cardboard :lol:
I have an old bathroom extractor for the fumes and everything :D
It would also be useful for powdercoating duties as I've been toying with the idea of a bit of DIY stuff - powder is cheap and a gun isn't that expensive either


Top
 Profile  
 
 Post subject:
PostPosted: Sun Feb 21, 2010 10:11 pm 
Offline
Group N

Joined: Mon May 26, 2008 2:33 pm
Posts: 401
Location: Wellington, New Zealand
Car Model: ST185
well I have experimented with 10" subs with an 11" frame before :lol:

8" don't go low enough for me and the 12" would be the primary subwoofer while I use a pair of 7" or 8" for midbass duties.

http://i60.photobucket.com/albums/h32/D ... resize.jpg

You could easily build a walk in spray booth out of cardboard. Look at refrigerator boxes. At one point I was going to build a whole collapsable paint area using plastic sheets and timber framing but I just don't have the room to store it. Its kind of like the plastic moulding machine my friend Rich and I have been planning on building.. not enough room lol.

Whats Blue Peter?

_________________
GT Four Adovansu

"I want to enjoy the powerful and nimble agility behavior."

Image


Top
 Profile  
 
 Post subject:
PostPosted: Sun Feb 21, 2010 11:56 pm 
Offline
Group N

Joined: Mon May 26, 2008 2:33 pm
Posts: 401
Location: Wellington, New Zealand
Car Model: ST185
I feel its important to chuck in a mix of stuff while I do my thing.

Gives you an indication of other friends progress and project evolution while I do my thing and highlights where I get my ideas / critique / motivation from :)
You've already seen Jonno's stuff in the past so time for a new project to have a look see

Every once and a while, I go over to my friend Nick's place to either help on his project or use his sand blasting cabinet.

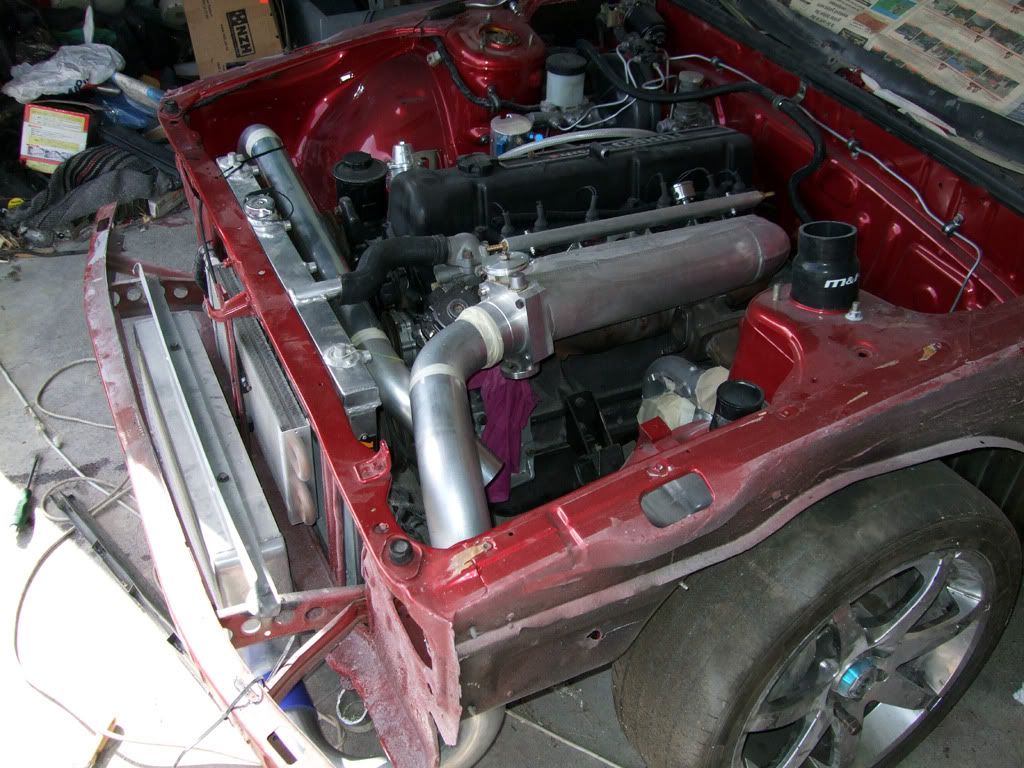
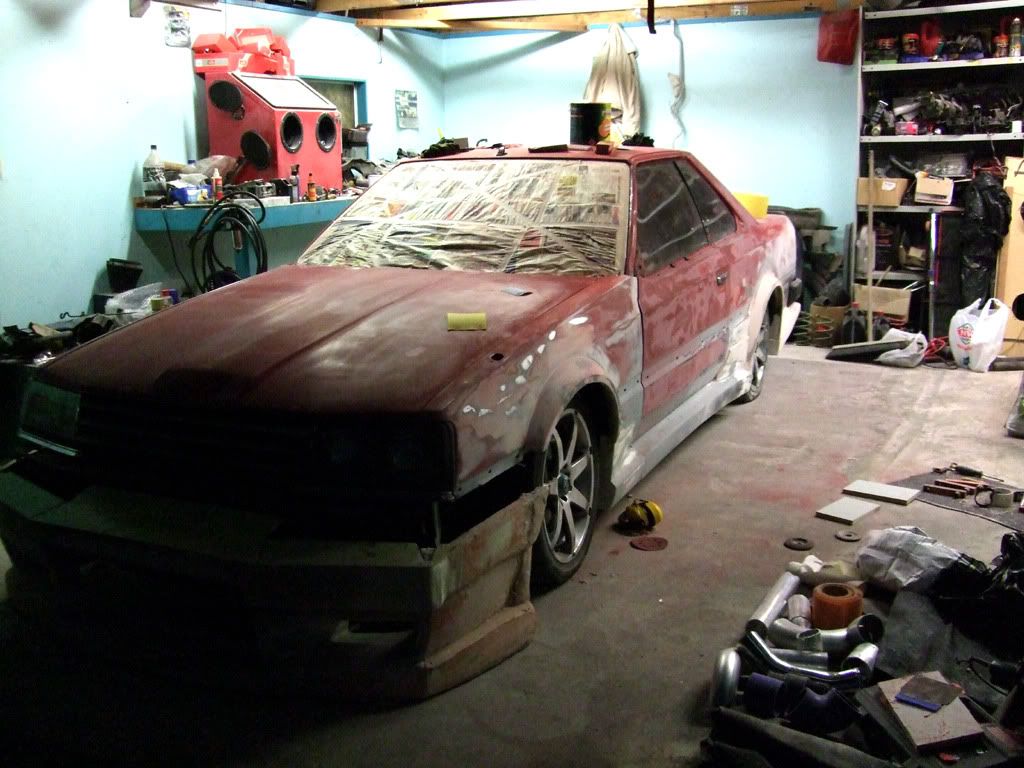
This is a R30 Skyline coupe that he is building up :) Runs an L28 with Holset HX40. I have the fun job of wiring in the Link and fixing up the alarm later *sigh.

Image


Image

One working bee day, I spent the whole time just cleaning his garage and sorting out his mess! Yes - I'm a nice guy :lol:

Check his build on jap nostalgic car :D
http://japanesenostalgiccar.com/forum/v ... sc&start=0

-----------

Sometimes I go over to Leigh's place to borrow tools or get him to whizz something up for me.
This time around, I found that my vice was marking up the engine mounts I was cleaning up. I remember him talking about "soft jaws" so I rung him up and he said he used aluminium pieces to make "soft jaws" for his vice.

So popped over and he was rebuilding his car trailer. Various changes and welding all done up - looked pretty good :). Apparently the next trailer will be a modular job that will have a tip mechanism as well be able to turn the trailer into a horse float as his fiancee's rides.

So after discussin the soft jaws, he quickly cut up his bits of aluminium (while in socks) and gave me he offcuts to use. Apparently there are more suitable pieces around, its more a matter of finding them.

I left him to finish up the trailer while he was wearing his safety jandels, while cutting up steel and welding..

Image

-----------

Back to the elephant :)

After going to Nick's place to use his sand blasting cabinet, i had some slightly better mounts.
The issue with snad blasting is that it reaches hard to get to places, but takes a lot of time. It is hobbyist stuff after all. That and there was no moisture filter on the hose as Nick was running my compressor and his in parallel for his work on the skyline. Gar!

So I decided to attach my metal bits and bobs with the wire brush attachment. Trick - go clockwise and anticlockwise to make the attachments last longer. Also, I found that going anticlockwise was the best way to remove paint and rust build up while slowly and lightly going over pieces. No need for hard pressure, just a steady hand over the object.
Image

Image

initially the gearbox mounting plate was left in malt vinegar to remove rust, with sand blasting afterwards. As you can see, once the rust was removed, pitting is evident. I'm not caring about the pitting so much as the rust removal.
Image

Rough casting left little bits of metal around. A quick file cleaned that up easily.
Image

Shiny! Bling :lol:
Image

A arm mount getting the big clean :)
Image

The ST185 mounts are, well not exactly the most desirable things in the world.
As countless people have upgraded their mounts using polyurethane or inserts, I purchased my poly mount set for the front and rear mounts from speed-source -> http://www.speed-source.net/ . really great guys who answered my questions and i bought a bunch of kit from them. Of note, because it's east west layout, the side mounts are just for holding the engine in position and the front/rear mounts are the stablisers for when the engine moves in position when the torque is applied (i'm sure you know it, but I learnt it by asking q's and its part of the story :P )

While I was on one of my journeys to Pick A Part, I noiticed something shiny in the engine bay of a st182. It was the drivers side engine mount. My rubber bushings were the worse for wear so I decided to get this shiny one (as I was going to polish mine anyway) and found that the st182 unit had more urethane in them. So why not get it?! It was shinier after all :) So after 3 hours work to detach the engine and raise it up, I had myself a $8 ngine mount :lol: So much work for such a small part. Subsequently, I got the passengers side mount as well, which took all of 15 minutes to get out. The gearbox mount fits onto the gearbox mounting plate :)
Image

Of note, the offset of the shim is slightly different between the st182 and st185. The speed source poly mounts are also offset. Not to mention that the aluminium cross member bushings also lower the cross member frame lower as well. Hopefully it all lines up nicely at the end of the day.
Image

Wire wheel cleaning up things nicely. Remember, slow and steady is the key :)
Image

Underside of the gearbox mounting plate.
Image

Ah the amp rack paint booth :) taped up and ready to go 8)
Image

And a test of spacing for the hangers. The hangers are bent in such a away to allow me to pull them off while still keep the the to be painted piece further in the booth. Worked out great :D
Image

Wax and grease remover and ensuring cleaning in all areas
Image

Taped up
Image

Etch primed up. I went etch and then sprayed with Bright Zinc-It. Only after did I realise that etch already has zinc in it :lol: Oh well, all part of the learning process. I used some chrome look paint I found on the other side of the garage to make it a little shinier than the bright zinc.
Image

Image

The front and rear mounts. Internals are to be replaced with the Speed Source poly mounts.
Now I do have access to presses, both friends and the neighbours workshop. But in my "f it, i'll just get into it, I followed Speed Source's guide of sectioning the metal and then removing the mount.
Image

Taking the blade of the hacksaw and inserting the blade into mount gap, I carefully saw out the inner metal. Patience was taken to ensure I didn't damage the outer mount metal too much.
Image

Moving forward from Speed Source's guide, I actually sectioned two areas out and folded the metal in between to create a larger gap. Of note, I had to actually cut at 3-4 places to make the inner shim mount loose enough to hammer out.
Image

Folded back using a screw driver and hammer - slowly but surely :D
Image

Tap out inner mount piece by applying tapping force around the circumference of the inner mount shim.
Image

Easy does it - don't need to damage the external mount piece.
Image

Ta Da!. As you can see, it takes a bit of metal removal to get it out.
Image

The first one came out easily. The second one, not so easy and required a lot of mangling and removing the centre section first. Easiest way to remove urethane was to use the hacksaw plade to cut through the polyurethane.
Image

While on mounting, the crossmember was covered in grease and grime. Some degreaser and a hose cleaned up a bit of it. I'll come back to it later. Work in progress.
Image

Painted passengers side mount. Not bad looking aye? A little paint overspray past the tape, but can easily be sanded off.
Image

My pretty Speed Source mounts. Because I (and friends) played with them initially, they became mismatched. So when I was test fitting them, one unit sat freely in the engine mount bracket and the other one didn't. That was until I noticed the numbers and figured out that there was. maybe a 1 - 1.5mm difference between two of the mounts. Poly 4 + poly 4 = one mount. Poly 2 + poly 3 = the other mount :)
Image

Nice 8)
Image

Engine brackets not painted, just cleaned for now. Will sort those out later.
Image

St182 mount on left, st185 mount on right. Milled mount on st182 + more urethane.
Image

I borrowed jonno's bench grinder and bought a sisal polishing wheel. I started on polishing, but am finding that it would be easier to sand back the casting and then polish later.
Image

Mounts etch primed. Oversprayed one, so will sand back and clean up before painting.
Image

_________________
GT Four Adovansu

"I want to enjoy the powerful and nimble agility behavior."

Image


Top
 Profile  
 
 Post subject:
PostPosted: Mon Feb 22, 2010 12:05 am 
Offline
Club Staff
User avatar

Joined: Thu Jul 14, 2005 12:44 pm
Posts: 4067
Location: drinking devil fuel
Car Model: ST205
MMM,
Liking that zinc/silver finish


Blue Peter is a kids program Google it, it's quite famous. Basically kids were given a Blue Peter badge for doing "worthy" things. It's now a common British saying. If you manage to do something smart like making a subwoofer box into a spray booth then you are elidgable for a Blue Peter Badge :lol:


Top
 Profile  
 
 Post subject:
PostPosted: Mon Feb 22, 2010 12:41 am 
Offline
Group N

Joined: Mon May 26, 2008 2:33 pm
Posts: 401
Location: Wellington, New Zealand
Car Model: ST185
Image

yay - badge for me :D

_________________
GT Four Adovansu

"I want to enjoy the powerful and nimble agility behavior."

Image


Top
 Profile  
 
 Post subject:
PostPosted: Mon Feb 22, 2010 1:00 am 
Offline
Club Staff
User avatar

Joined: Thu Jul 14, 2005 12:44 pm
Posts: 4067
Location: drinking devil fuel
Car Model: ST205
ROFL

Love that!


Top
 Profile  
 
Display posts from previous:  Sort by  
Post new topic Reply to topic  [ 168 posts ]  Go to page Previous  1, 2, 3, 4, 5 ... 12  Next


Who is online

Users browsing this forum: No registered users and 10 guests


You cannot post new topics in this forum
You cannot reply to topics in this forum
You cannot edit your posts in this forum
You cannot delete your posts in this forum

Search for:
Jump to:  
Powered by phpBB® Forum Software © phpBB Group